Thursday, October 12, 2017

Golden Repeater

The golden repeater is just like the Minecraft redstone repeater. The only difference is that it has no delay. This makes it very useful for powering platform screen doors and automatic platform gates.

When a redstone signal of any power level reaches the back of the golden repeater, it will output a power 15 redstone signal at the front. Like the Minecraft repeater, the golden repeater can be locked and chained.

Recipe

The shapeless recipe for the golden repeater uses eight redstone repeaters and one gold nugget. Eight golden repeaters are crafted at a time.
The recipe for the golden repeater.

Gallery

Locked, powered, and unpowered golden repeaters.

How To Use the Mod

If you're stuck or confused by the written tutorials, download this demo world showcasing all the features in the mod.

A note about the Passenger Information Display System and the Next Train prediction system

As outlined on this page, the system is still in beta. It doesn't really work in the test world or in the mod in general. I am looking to fix this in the next update. Sorry about that.

Brief Overview

The following series of screenshots are taken from the demo world.

Trains can be put into dispensers. When powered by redstone, the dispenser will place a train on a nearby booster railTrain Removers can also be put into dispensers and remove a nearby train.

The Train Timer can be right clicked with a brush to change the amount of time each train stops at the station rail.

Just like normal Minecraft detector rails, the detector rails in this mod can output a redstone signal when trains pass over them.

Sandstone underneath an escalator landing will make the escalator go up; sand underneath will make it go down. Don't forget to power the escalators with redstone!

Platform screen doors and automatic platform gates can be powered by a line of redstone dust underneath. Golden repeaters act like normal Minecraft repeaters without delay.

A switch lever next to a curved rail will make it into a split. Power the lever to make trains follow the curve; turn it off to make trains go straight.

Reverse rails change the direction of the train.

Intersection rails can be used where rails overlap.

Booster rails will only change the train's speed if the train is going in the same direction as the rail. If the train is going in the opposite direction, the booster rail will just act like a normal rail.

Wednesday, October 11, 2017

Creating a Resourcepack

Creating a resourcepack can allow players to change station names, routes, and colors. To get started, download the sample resourcepack here.

What You'll Need

The following pieces of software are highly recommended.

Getting Started

After you've download the sample resourcepack, open it. There are a number of locations where you can change the station names and routes. Navigate to the following files or folders.
  • \assets\mtr\lang folder: Here you will see all the predefined stations used on the Station Name block. At the bottom, you will see the destinations of the different lines used on the Platform Screen Doors and the Automatic Platform Gates.
  • \assets\mtr\textures\routes folder: Here you will see the graphical routes used again on the Platform Screen Doors and the Automatic Platform Gates.
  • \assets\mtr\textures\StationName1.png file: This file contains all the stations used in the Station Name blocks.
  • \assets\mtr\textures\Map.png file: This file is the map of the whole train system. Edit this file to display a map of your own system.
  • \assets\mtr\textures\displays\lightrail folder: This folder contains all the currently defined light rail routes and their displays. For example, if you want to create a light rail route 101, create the following files and put them into this folder.
    • MTR-101-1.png file: Southbound front display
    • MTR-101-2.png file: Northbound front display
    • MTR-101-3.png file: Southbound side display
    • MTR-101-4.png file: Northbound side display
    • MTR-101-5.png file: Southbound interior side display
    • MTR-101-6.png file: Northbound interior side display
    • MTR-101-7.png file: Rear number display
That's pretty much it! Copy this .zip file into your \.minecraft\resourcepacks folder and launch the game!

Tuesday, October 10, 2017

Next Train

The Next Train block, the Platform Marker item, and the Passenger Information Display System work together to display train arrivals. Currently, the train prediction system is still in beta and might not work perfectly. However, all players are still encouraged to try it out. It will be polished and improved as newer updates roll out.

Recipe

Until the system is no longer in the beta phase, there will not be any recipes for the Next Train block and the Platform Marker item. Players can still use these in creative mode.

Usage

This system can be a little tricky, so follow the steps below closely.
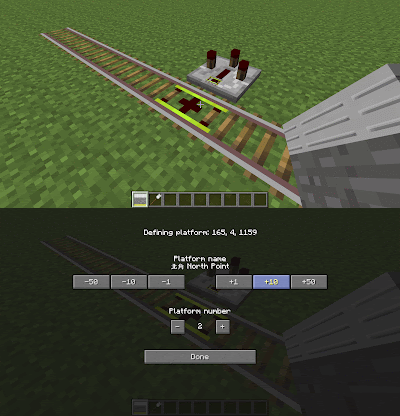
  1. Using the Platform Marker item, right click a block to define it as a "station". This can be used on any block, but it is recommended to use it on a station rail.
  2. When the GUI opens, choose a name and platform number for this station. This is completely arbitrary but should be recognizable later on.
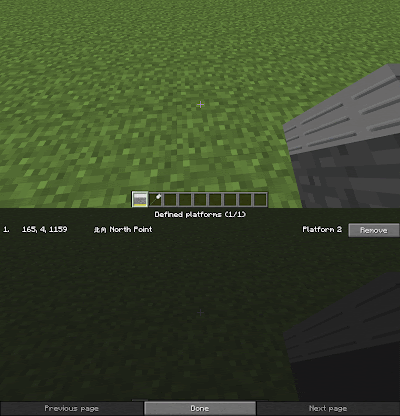
  3. The Platform Marker item can be shift-right clicked to show a list of all stations. Due to a bug, this might have to be repeated before the list of stations shows up properly.
  4. On the section of track before the station, place down a station rail with a Next Train block underneath.
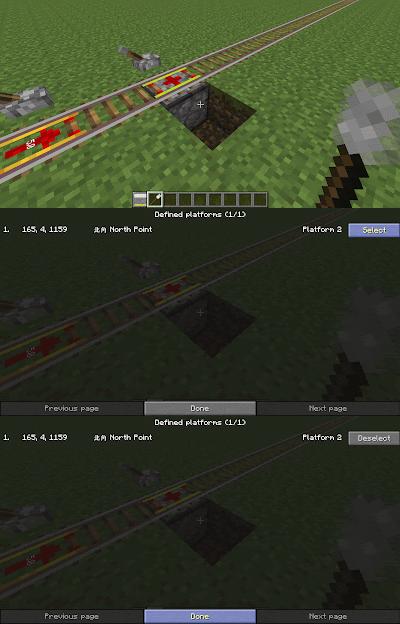
  5. Right click the Next Train block with a brush and choose the station defined earlier.
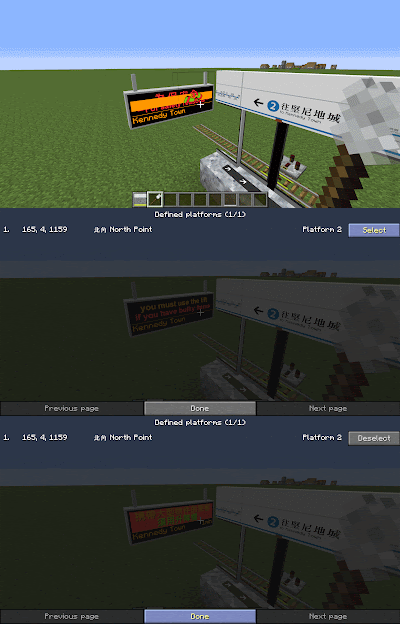
  6. Go back to the station and right click the Passenger Information Display System with a brush. Again, choose the station defined earlier.
  7. When a train passes over the Next Train block, the station will begin to track the train. The Passenger Information Display System will start showing an estimated time of arrival based on distance between the train and the station.
1-2. Define a station by right clicking a block with the Platform Marker.
3. The Platform Marker can be shift-right clicked to show a list of stations.
5. Right click the Next Train block with a brush and select the station
6. Repeat this for the Passenger Information Display System.
7. When a train passes over the Next Train block, the station will begin
to track the train.

Saturday, October 7, 2017

Rail Switching

The switch lever is a block that can be used to create splits.

Recipe

Simply throw a normal rail and a lever onto the crafting grid. This recipe is shapeless.
The switch lever recipe.

Operation and Physics

Placement

The switch lever can be placed next to the "stone slab textured" part of a rail curve. It can be powered to control which way the train goes. Refer to the images below.
Place the switch lever next to the "stone slab textured"
part of the curve.

When powered, the train will go on the curve.
When unpowered, the train will go straight.

Gallery

A network of switches.

A switch lever placed next to a curve.