Rails are the most crucial part of this mod (of course, the trains are important too). Since the 2.0.0 update, trains no longer run on the default Minecraft rails and these rails are used instead. The mod includes eight types of rails:
- Normal straight and curved rails
- Booster rails
- Upwards sloped rails
- Downwards sloped rails
- Detector rails
- Station rails
- Reverse rails
- Intersection rails
The usage, function, and placement of these rails are explained in detail below. See
this article for rail switching.
Recipes
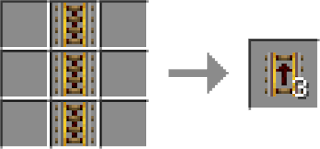
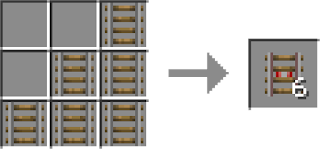
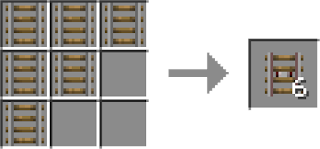
The recipe of the different types of rails are shown below. They are shaped recipes and are crafted from Minecraft rails.
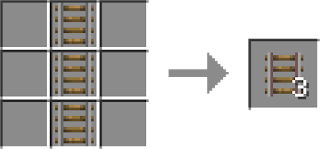 |
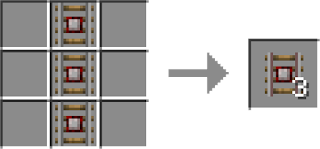
The normal rail recipe.
Note the slight color difference between Minecraft rails
and the rails in this mod. |
 |
| The booster rail recipe. |
 |
| The upwards sloped rail recipe. |
 |
| The downwards sloped rail recipe. |
 |
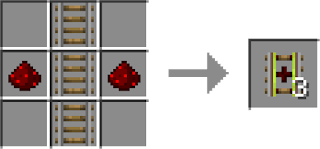
| The detector rail recipe. |
 |
| The station rail recipe. |
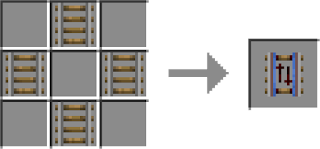 |
| The reverse rail recipe. |
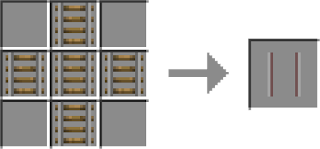 |
| The intersection rail recipe. |
Operation and Physics
Placement
Unlike Minecraft rails, rails in the mod can be placed in eight different directions instead of four. This means that diagonals can be created.
Normal rails are quite different from Minecraft rails in that long stretches of track can be created at once. To place straight rails, follow the steps below.
- Stand and face in the direction where you would like the rails to go.
- Place down a normal rail. A chat message should pop up saying "Connecting to [x, y, z]". When you hover over the rail you're holding in your inventory, it should also say "Connecting to [x, y, z]".
- Walk in a perfectly straight line and place down another normal rail. The elevation must also be the same.
- A straight section of track should be created between the two rails that were placed.
To place curved rails, follow the steps below.
- Stand and face in the direction where you would like the rails to begin.
- Place down a normal rail. A chat message should pop up, "Connecting to [x, y, z]". When you hover over the rail you're holding in your inventory, it should also say "Connecting to [x, y, z]".
- Walk to the endpoint of the desired curve. Place down another normal rail in the orientation that will fit the curve. 90 and 45 degree curves are allowed.
- A curved track should be created connecting the two rails that were placed.
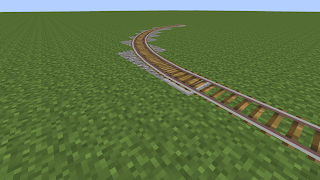 |
| An example of a curved rail. |
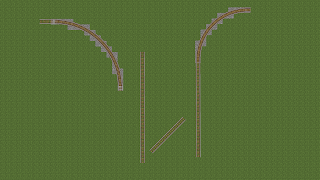 |
| Other examples of rails. |
Curved rails can be used to create splits. Put a
switch lever adjacent to the "stone slab textured" block of the curved rail.
Booster rails, detector rails, station rails, and reverse rails can be placed like normal Minecraft rails but with eight possible directions.
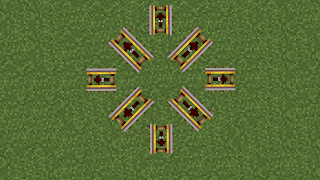 |
| Booster rails in eight different orientations. |
Upwards and downwards sloped rails will create a straight section of track of sixteen blocks that go up or down one block. Trains will move up or down accordingly.
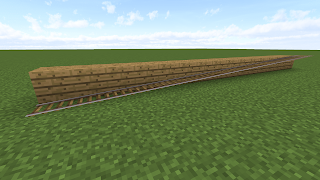 |
| Sloped rails go up one block vertically and sixteen blocks horizontally. |
Behavior and Usage
Booster rails are very important because trains can only be placed on them. When powered, it will be in booster mode; when unpowered, it will be in slowdown mode. As a train goes over a booster rail, it will be constantly accelerated or decelerated until the speed of the booster rail is reached.
When right clicked by a
brush, a gui will open. There are two editable values, the boosted speed and the slowed speed. Depending on whether the rail is powered, the train will accelerate or decelerate to that given speed. The maximum speed that a train can be boosted to is 50m/s and the minimum speed 0m/s.
The recommended speed for trains is 19m/s. If the train goes over 20m/s, there will be a chance that it will miss the booster, detector, slope, and station rails and ignore them completely. Also, the train could derail at curves. Speeds over 20m/s can be safely used on long stretches of straight rails, but multiple unpowered booster rails in a row at the end of the stretch should be used to ensure that the train slows down properly.
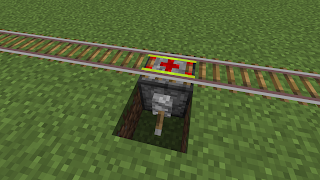
Detector rails work just like Minecraft detector rails. When any train car passes over the rail, a redstone signal of power 15 is emitted.
 |
| A detector rail with redstone dust connected to it. |
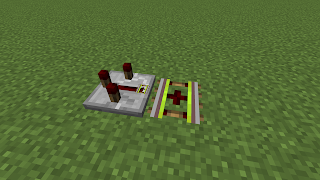
Station rails can be used to stop the train and/or change the route of a
light rail train. When a
route changer block is placed under a station rail and a light rail train passes over it, the destination display will change. See the
route changer page for more information.
 |
A route changer block underneath a station block.
The station block is powered so that trains will change their
routes without stopping. |
The
train timer can be placed next to the station rail to make train doors open. See the
train timer page for more information.
 |
| A train timer next to a station rail. |
Reverse rails are used to reverse the direction of the train. They will only function when powered; if unpowered, the rail acts as a normal straight rail.
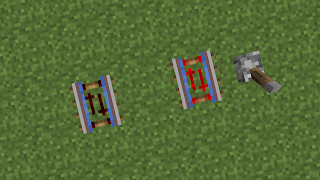 |
| An unpowered reverse rail next to a powered reverse rail. |
Intersection rails act like straight rails and are used when rails cross over. They will automatically be spawned when two overlapping sections of rails are generated. The intersection rails can also be manually placed, connecting to all adjacent rails.
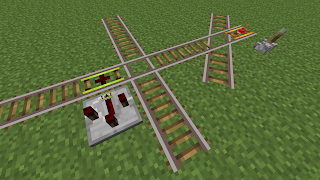 |
| Two examples of the intersection rail. |


I would like to ask how can you reverse your train to the opposite direction?
ReplyDeletebtw the train always open the wrong door lol
DeleteHi! Thank you for your interest in my mod! I have yet to add rails that reverse the train's direction, so that's not possible yet. Also, did you put the train timer next to the station rail on the side that you want the doors to open? Let me know if you have any more questions!
DeleteOh the train timer works! btw I am looking forward to your updates to include the rails that reverses the train's direction coz it's such a great mod! Hopefully more trains can be included too!
DeleteHey! An update was just released that includes reverse rails! Check it out!
DeleteSounds great! Thanks for your effort on developing this mod! Btw I think that adding A-train or M-train into this mod will make it look more Hong Kong :P
DeleteHI! That's a great job
ReplyDeletebut I can't adjust the speed of booster rail when playing on server
the timer also can't be adjusted 😭
And will you add the board for Tsuen Wan Line and Island Line thx
😀
Hey! Thanks for your comment:)
DeleteDo you have the latest version (1.10.2-2.1.2) on both the client and the server? Also, are you using the brush to change the booster rail?
Yes I will update the routes (since the addition of the South Island Line) for the Tsuen Wan Line and Island Line.
Thanks for your suggestions!
Yep I'm using the latest version
Deletethere's a window appeared when I tapped on the booster track but it just gone right after it appeared
But the timer will output error in the console
Its java.lang.NoClassDefFoundError
DeleteI don't have the code and I can't solve the problem by myself 😂
could you have a look at it plz
But probably it's a jdk version problem and I'll try to change a version and find out whether it will be solved
It's strange no error is found by the compiler but when running the application, it can't find the class
Oh I find the source just at the right side of your website😀
DeleteI thought it would be at download page
my fault
Oh did your issue get resolved? If not, do you mind sending me the crash report? It's a text file in the .minecraft\crash-reports folder. Thanks!
DeleteActually it did not crashed but just got forge error in the console.😀
DeleteThe booster track window can now be opened after I migrated the map from spongeforge to forge
But when I was trying to adjust the time interval for the stop time it still outputs error.I'll send you the log.
PS:Your mod it's really nice.Now I have good-looking transportation from the town center to my high school(in minecraft)😀
still cant get a curve any tips such as minum block distances e.e 3 blocks across one block upwards
ReplyDeleteHi! You must make sure that the rails are facing the right ways. For example, if you want to make a 90 degree curve, the second rail's orientation must be perpendicular to the first one.
Deletestill not working any scaling or any pics with block distances?
DeleteTry this:
Delete1. In a flat piece of land, face north. (You can press F3 to see which way you are facing.)
2. While facing north, place down a normal rail.
3. Walk 10-20 blocks north.
4. Walk 10-20 blocks east.
5. From where you are standing now, face west.
6. While facing west, place down another normal rail.
Let me know if you have other questions. Hope this helps!
can I actually create a sloped curve rail by this mod?
ReplyDeleteHi! Not at the moment, but that's a good suggestion. I might add that in the future. Thanks!
DeleteI want to use this mod but because of stupid Norton Security I cant download forge. Please tell me how to download forge without Norton deleting it the second I download it!
ReplyDeleteHi! Sorry I don't know much about your antivirus software, but I think if you whitelist the forge installer file it should work.
DeleteI can tell you are in a different time zone.
ReplyDeleteWhere I am it is 5:16 PM
haha yes I've grown up in Hong Kong but I am studying in Seattle Pacific University right now
DeleteHi, your mod is amazing!
ReplyDeleteHowever, when I lie down the rail, the rail would not be consumed, why?
Also, please consider to make the rail larger in later version for more realistic rails, thank you
Hi,So I was building track and By Some Reason I can't create curved tracks anymore.I was doing the same as before and everytime i try to create a curved track it says 'curved tracks must have a radius between 3 and 255' and it create a really long stright track instead, I really don't know what caused it and how i can fix it,but i can still create curved tracks on other worlds, Is there A curved track limit or what?
ReplyDeleteThis comment has been removed by the author.
ReplyDeleteThis comment has been removed by the author.
ReplyDeleteHelp, when I put curved rails and the train passes, the train lags and the wheels come out and lags too.
ReplyDeletePicture: https://drive.google.com/file/d/1TkXMlR_z86wBoWANsBOAuXD9Nivif2hp/view?usp=sharing
Picture 2: https://drive.google.com/file/d/13Bn-_ByTN2RGh9G3XazuVNBWjboSI9ph/view?usp=sharing
DeleteHey check out how I make the train lags!!!
DeleteYoutube:https://youtu.be/NkAobr71lLY
您好!我非常喜歡您的火車模組,但希望彎曲的軌道教學可以簡單一點,我看不懂@@
ReplyDeleteCurved rails = Cursed rails!!! :(
ReplyDeleteAsrdtdwaesq
ReplyDeleteAdrith Nair 3rd A1
ReplyDelete